
The cape that I am showing in this tutorial is a reversible Batman cape but you can use any combination of colours/fabrics depending on what your little Superhero likes/wants. I'll show you some other ideas later.....


You will need:
- A sewing machine and thread
- 2 metres of fabrics (I used a black sheeting fabric which was £2 per metre and a red stars fabric at £3.49 metre. You could use any sort of cheap sheeting fabric or polycotton.
- Sew on Velcro or you could use snaps or a button. (I prefer not to use anything that ties around the neck).
- Felt (colours depend on which superhero you want to be!)
An old sheet (to make the pattern)

First you need to make a pattern. I found the best way of doing this was to use an old sheet. I folded it in half and then drew a very rough cape shape with a felt tip. I am rubbish at drawing so you really don't need any skill to do this! I used a small plate to get the circle for the neck. I found this the best way as you can try it on before you cut your fabric to see if the width and length are right for your child. Don't forget it will end up slightly narrower and shorter once it is sewn.

Then cut out two cape shapes. One from each of your fabrics.

Like this!

Next you need to decide which Superhero you want to be. I was making this for Sam's friend who I knew wanted to be Batman. I decided not to do a logo on the other side as I really liked the star fabric. There are hundreds of websites that have downloads for Superhero logos. I used this blog for the Batman logo and printed it out onto paper.

You can then use them as a template to cut out the felt shapes.

Stitch around the Batman logo using black thread.

Find the middle of your cape and decide where you want your logo and then pin in place.

Machine sew around the edge. (You could use bondaweb to hold in place if you wanted but I didn't bother as its quite expensive).

Once your logos are finished, place the capes together right sides facing and pin. Sew around the edge from the bottom of the cape up around the neck and back down to the other side. I leave the bottom edge of the cape fully open as it makes it easier to turn it inside out.

Turn the cape inside out and press. Fold up the bottom edge making sure it is straight along the bottom, press and pin.

You then need to top stitch close to the edge all the way around the cape. This will also close the bottom hem. I put black in the top of the sewing machine and red in the bobbin so that when I top stitched both sides had co-ordinating thread.

All you need to do now is sew on two small pieces of velcro for the fastening. One on each side of the cape.
Voila! You have a super dooper REVERSIBLE Superhero cape!!
You can make girls versions too. This is Izzy's Batgirl Cape. I used a very cheap shiny pink fabric on the reverse.

Izzy wanted the other side to be a Princess cape so I appliqued a heart shape of princess fabric onto pink felt and sewed it on as with the Batman logo.


I made Izzy's friend Fern a gold version. This had a personalised Superman logo. You can download the whole alphabet from this website. Great for personalising capes.

Fern's cape also had a princess heart on the back. The gold fabric was a nightmare to sew with. I don't recommend it!

This is another version I made a while ago for Sam using blue and red polycotton. Superman on one side and a Prince cape on the other hence the Crown!


So where is the 'No Sew' version I can hear you shout?
For Sam's party I wanted to make everyone a personalised superhero cape instead of giving them party bags (I know I am mental but it seemed like a good idea at the time!) It was too expensive and time consuming to make everyone a proper cape so I needed to find a fabric that I didn't need to sew. I eventually found it at Fabricland and it was only 75p a metre! Its almost like paper but much much stronger as it doesn't tear and it also doesn't fray. I simply cut out the same cape shape, attached some velcro and it was a cape ready to go! You can use stick on velcro for the fastening. The fabric was available in both red and blue.
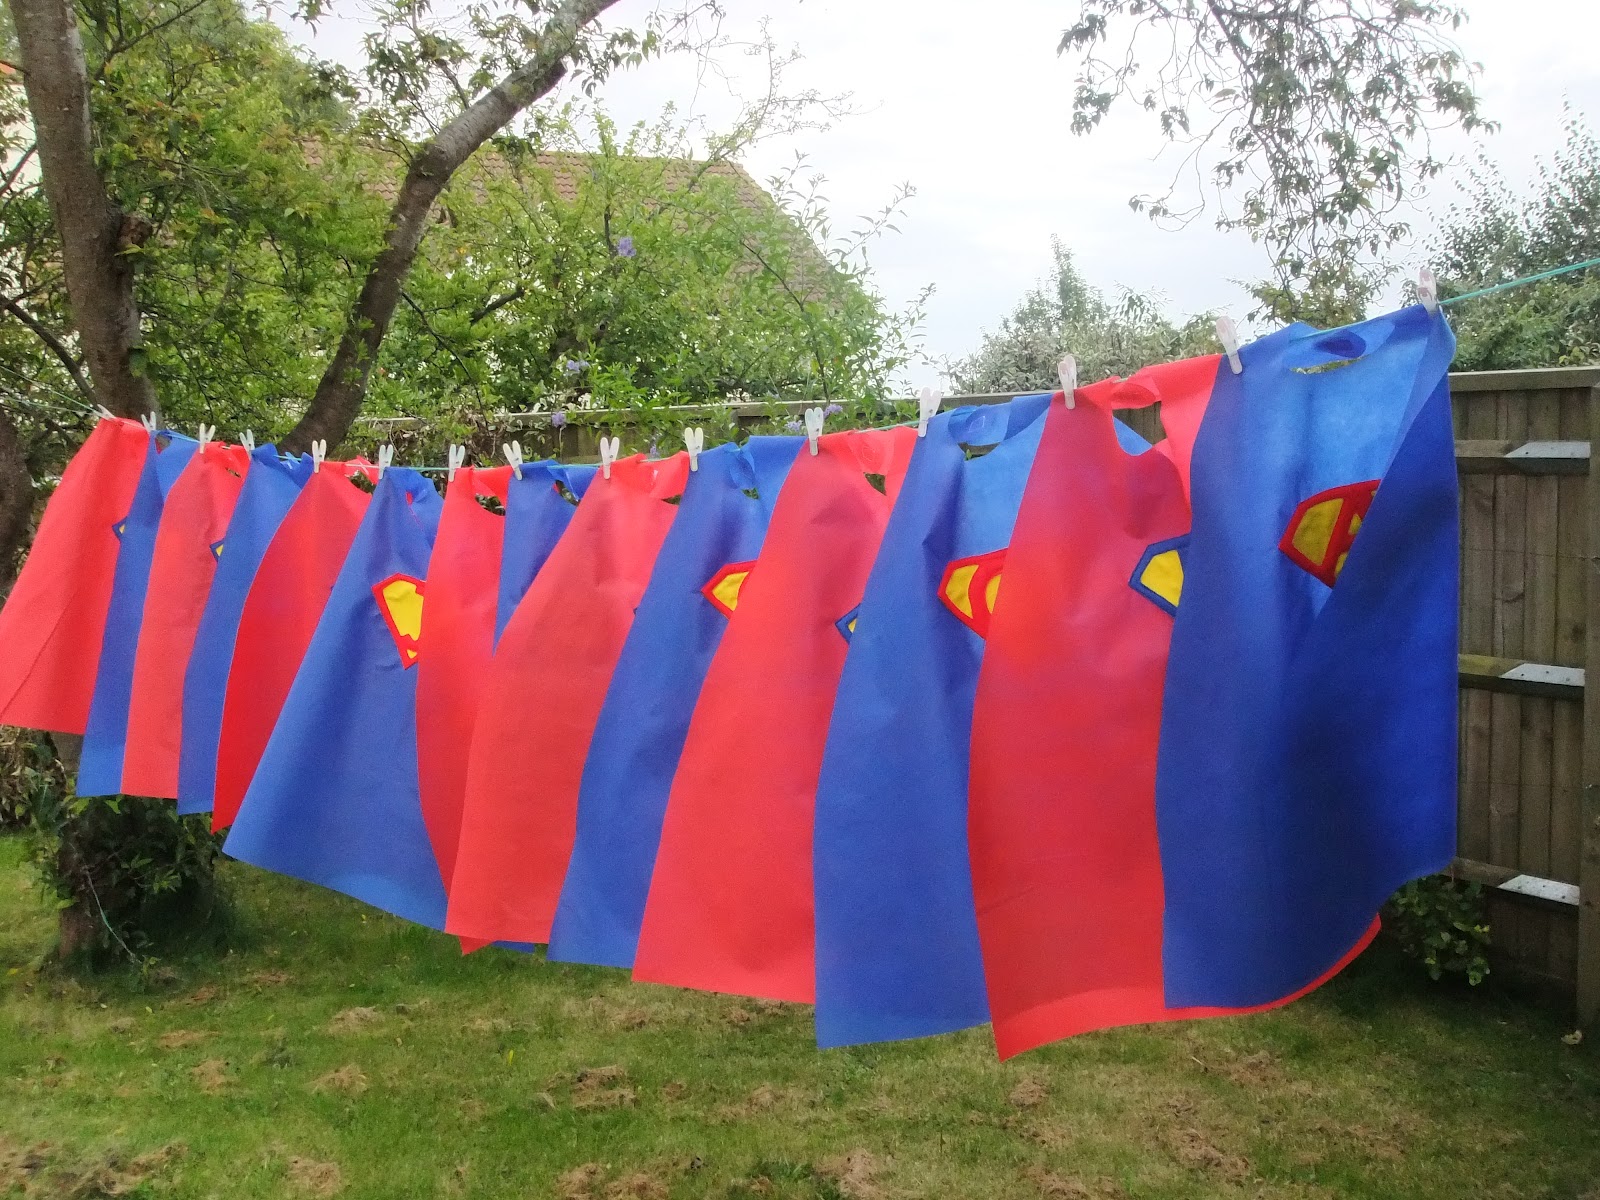
I personalised mine by sewing on superman logos but you could use Bondaweb instead and just iron on a felt logo. Just be careful and use a coolish iron and a tea towel as you cannot iron directly onto this fabric. I found this out when I tried and it melted onto my iron! I'm really sorry that I don't know what this fabric is called. It didn't say on the roll and I am way too scared to speak to the staff in Fabricland. I had already been told off for pulling the zips the wrong way out of the elastic band holding the bundle together (yes seriously!) as well as for queuing in the wrong place. (Please don't get me started on Fabricland!!).
Anyway back to the capes. Lovely 'non sew' capes (kind of)


The Superhero party was great. My friend Elena made this amazing cake despite the fact that her house flooded the night before the party and she was up to her ankles in water. We had to change the party venue 15 hours before the party began due to the flooding. (It was originally planned as a summer party in the garden ha ha!)

This is one of the dads being a 'baddie'. The Superheroes tied him up with toilet rolls.

SuperSam (sporting a weird mix of Spiderman and Superman attire)


Look the no sew capes work!!


A handmade Pinata also made by Elena added to the fun


